Shared or Group Calendars in IBM Notes
Mat Newman June 8 2016 18:43:29
The topic of Shared or Group Calendars has come up a lot recently during discussions with Customers. The main requirement is a calendar which can have multiple people assigned to managing the Calendar content, in addition to this Calendar having full Calendaring and Scheduling (C&S) functionality for things like sending meeting invitations to Internal or External recipients, receiving replies, sending update notifications, reschedules, repeats, etc. In other words, a "Generic" Calendar that doesn't belong to a specific person, and can be managed by any number of people.The other requirement was to make this Calendar visible when accessed by users out of the office on their mobile device. In a future blog, I'll share how to add this newly created calendar to anyone's IBM Traveler/Verse Mobile calendar who needs to see the calendar when they're mobile.
This functionality isn't difficult to create (of course! it's Notes!), but I couldn't find the steps for it anywhere for the customers to follow, hence ... here it is.
In our demonstration below, the calendar will simply have the title "The Group Calendar".
The Steps: an Overview
- Create a Mail-In Database document to control the Database (calendar) profile,
- Create the Database,
- Change the "Owner" of the Database in the Profile,
- Change the "Launch" option for the database,
- Add users through the Calendar Profile "Access and Delegation" who will be able to Read/Edit the Calendar Content.
It's as simple as that. Now for the Details.
1. Create a Mail-In Database document to control the Database (calendar) profile:
The Mail-In Database document is required for two reasons:
- It enables the Domino Server to understand that your Shared Calendar has it's own Internal and External (if required) address for the purposes of C&S routing,
- The "Name" used in the Mail-In database document can be assigned as the Calendar Profile "owner" in the database, hence Meeting Invitations, etc, that are created by the calendar will come from this "Name", ie: "The Group Calendar" mentioned earlier
Your calendar can have any name you require, for example if you are creating a calendar for your Marketing department, you might call it "Marketing Calendar", IT: "IT Calendar", etc...
The huge tip here is that the "Name" assigned in the Mail-In Database document must be in canonical (ie: Notes) format, otherwise you will not be able to choose this name later when assigning it as the "Owner" of the database.
To create the Mail-In Database configuration document:
- Navigate to the "Mail In Databases and Resources" view in your Domino Directory,
- Choose "Add Mail In Database" (note: you may require Administrator access to add this type of record),
- Complete the fields to configure the Mail In Database,
- Save and Close.
Figure 1: The Mail In Database and Resources view from the Domino Directory
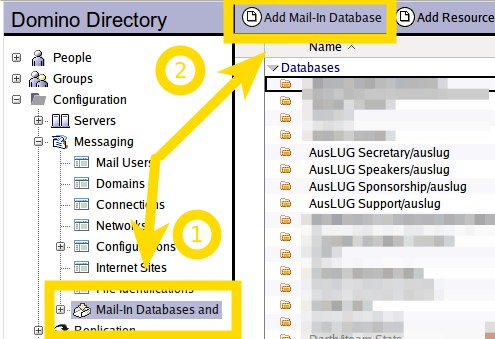
Figure 2: The Mail In Database document with all fields completed
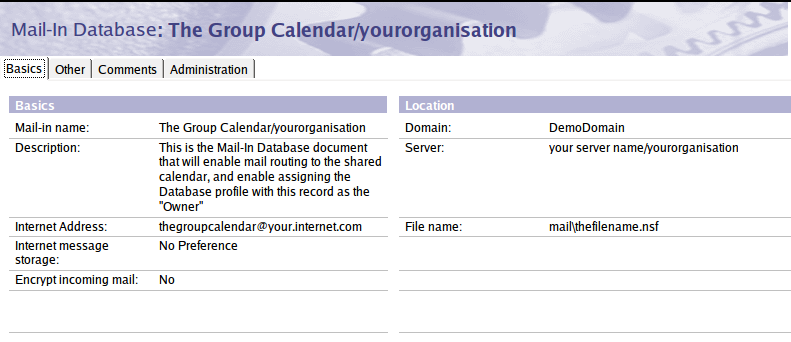
The key fields in the Mail In Database document are the Name, whether it has an internet address assigned, and then the Domino mail routing information that will enable the database to receive Email/C&S notices.
| FIELD | EXAMPLE | DESCRIPTION |
| Mail-in Name | The Group Calenda/yourorganisation | |
| Description | (Optional) Why this record exists | |
| Internet Address | thegroupcalendar@your.internet.com | Required if you want to send or receive C&S information with users outside of your corganisation |
| Internet Message Storage | No Preference | Determines if message conversion will be done by the server |
| Encrypt Incoming Mail | No | No recommended in this instance |
| Mail Server Settings | ||
| Domain | YourDomain | The Notes Domain within which this database resides |
| Server | yourserver/yourorganisation | The "Home" mail server which will be used to host this database |
| File name: | mail\thefilename.nsf | The actual Database File Name |
Once you have completed the fields in the Mail In Database document, Save and Close the record.
2. Create the Database:
Now it's time to create the database itself.
- On your Keyboard, [Ctrl]+[N], or from the menu in IBM Notes or IBM Domino Adminstrator [File] -> [Application] -> [New],
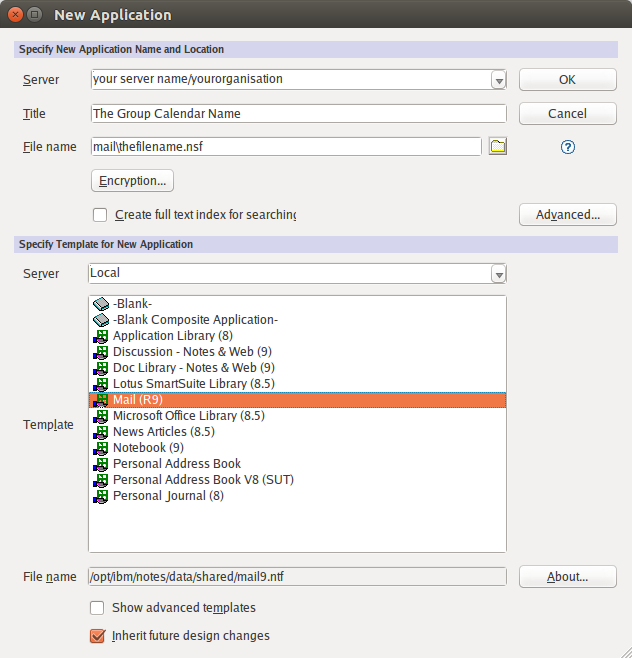
- Complete the Database choices in the New Database dialog box,
- Choose OK
Figure 3: The New Application dialog, with all options completed
| Option | EXAMPLE | DESCRIPTION |
| Server | Your server/yourorganisation | This should match the Server used in step 1 |
| Title | The Group Calendar | This is the descriptive name for this shared calendar, it will be visible to anyone browsing applications on the server, and in Domino features such as the "Application Catalog" |
| File Name | mail\thefilename.nsf | The actual location of the database on the (Server), Note: This should match the location specified in the Mail In Database record created earlier |
| Template server | can be LOCAL or SERVER | Both the local Notes software and the Domino server host the "Mail" template |
| Template | Mail (R9) | The Mail Template will be used for this database since it contains all the required C&S Functionality |
3. Change the "Owner" of the Database in the Profile:
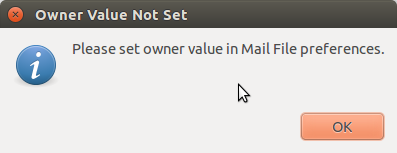
Upon opening the Database for the first time, the creator will be prompted to change the "owner" value in the "Mail File Preferences"
Figure 4: Prompt to change the owner
To complete this step:
- From the Database "Action Bar", choose [More] -> [Preferences],
- Next to the "Owner" field choose [Change],
- Choose [Yes] to confirm the Owner Name Change,
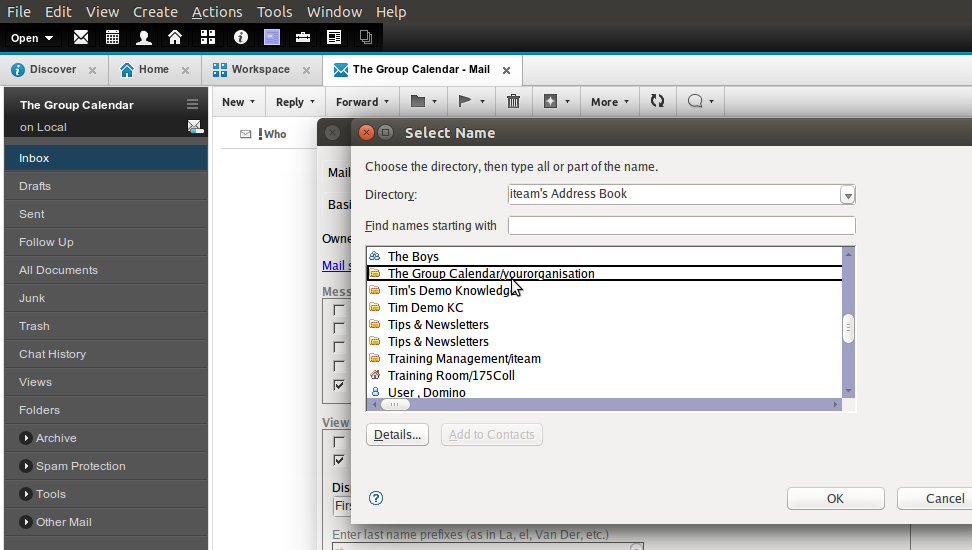
- Browse through your Domino Directory to locate the Mail In Database name created at Step.1.
- Choose [OK] to confirm the Name,
- Choose [OK] to modify the Mail File Preferences
Figure 5: Accessing the Database Preferences
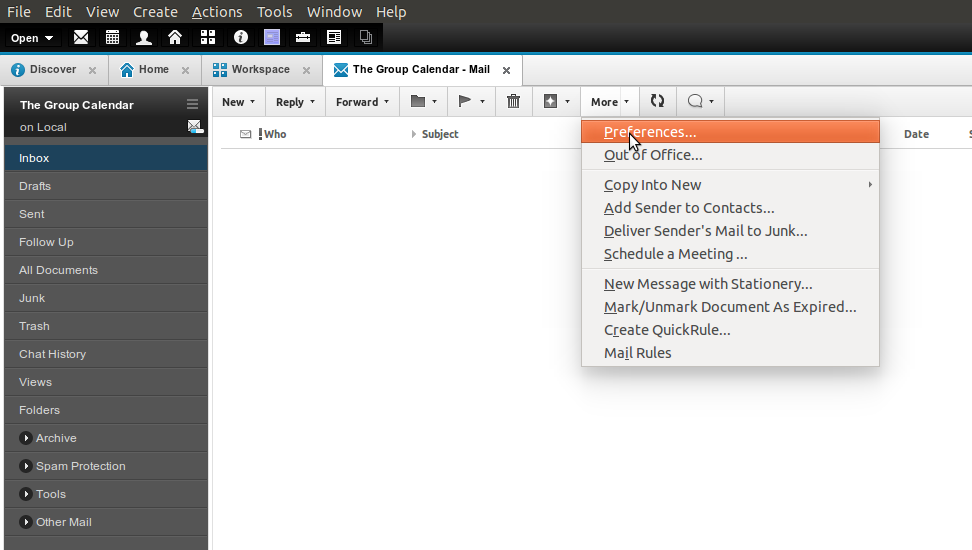
Figure 6: Changing the Owner
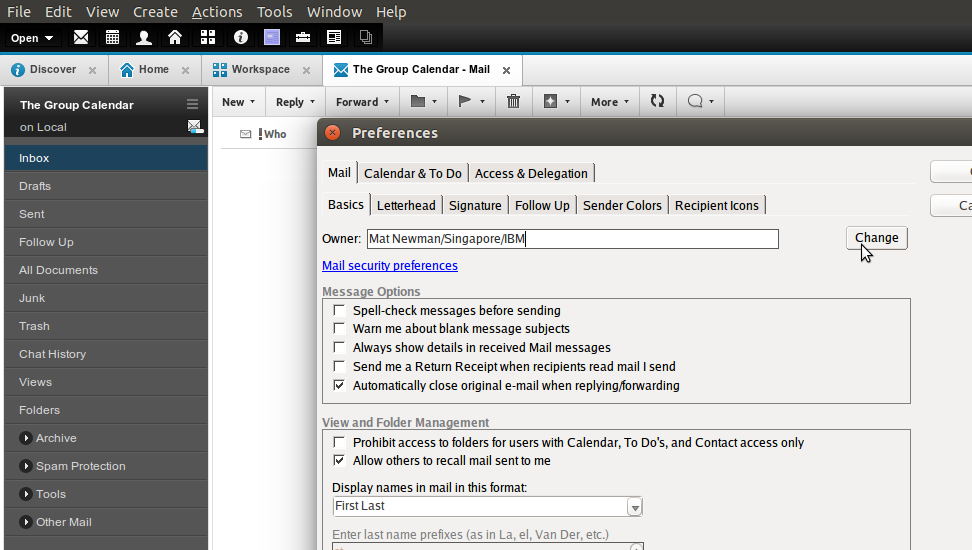
Figure 7: Confirm - "Owner Name Change'
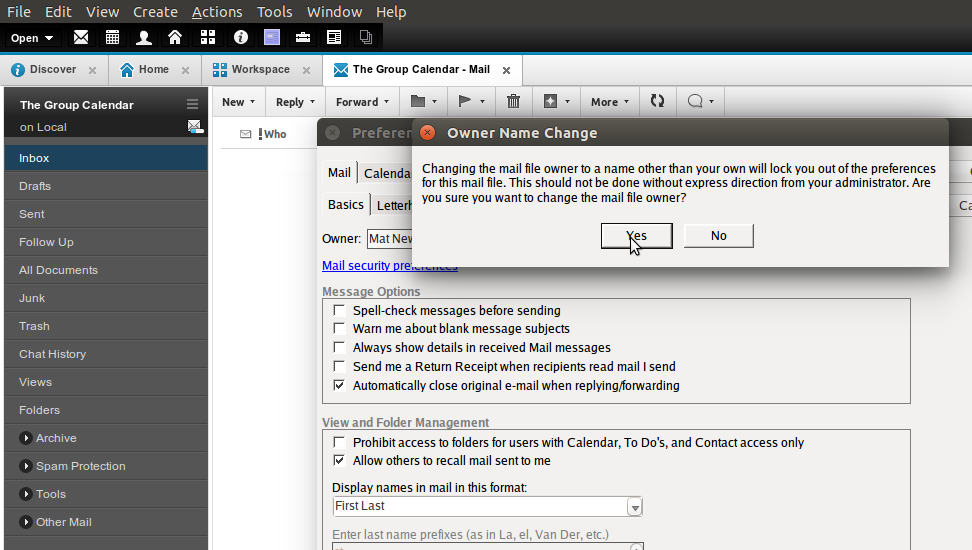
Figure 8: Select the 'Mail In Database' created earlier at step 1 as the new owner
4. Change the "Launch" option for the Database:
This one is pretty simple. You've created the database for the purpose of Shared Calandering, right? So it only makes sense that when the database is opened (whether from a Notes open dialog, or by accessing it using one of the many Notes calendar features available) that the Database should open automatically to the Calendar view, rather than the Mail view.
The process for changing the database to open to the Calendar, rather than the Mail view is really simple:
- Access the Database Properties, [File] -> [Application] -> [Properties] ( or [Alt]+[Enter] on your Keyboard),
- Switch to the "Launch" Tab,
- Change the Notes Launch options from "MailFS" (the default) to "CalendarFS"
- Close the Database Properties dialog
- Close the Database
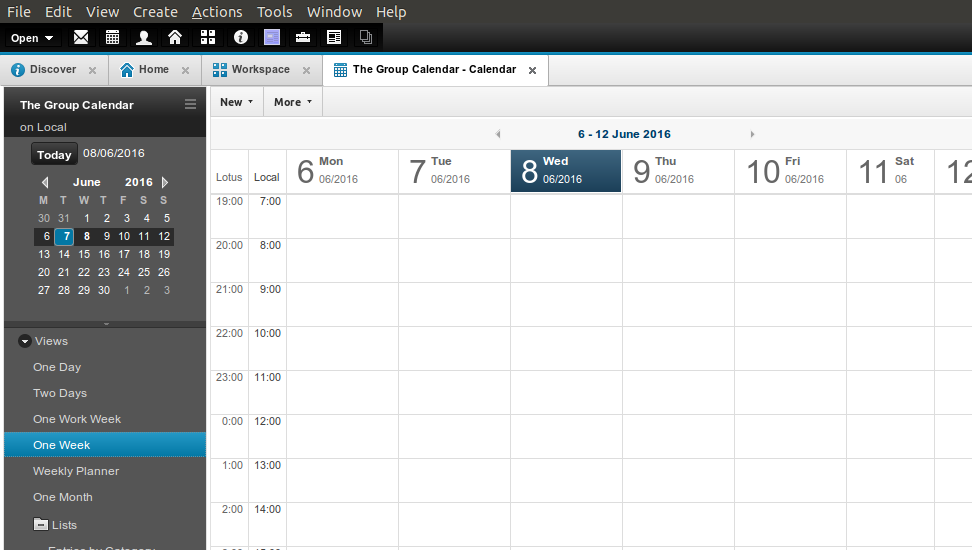
When re-opened, the database should now open directly into the "Calendar" view, as shown in Figure 11.
Figure 9: Accessing the Database Properties
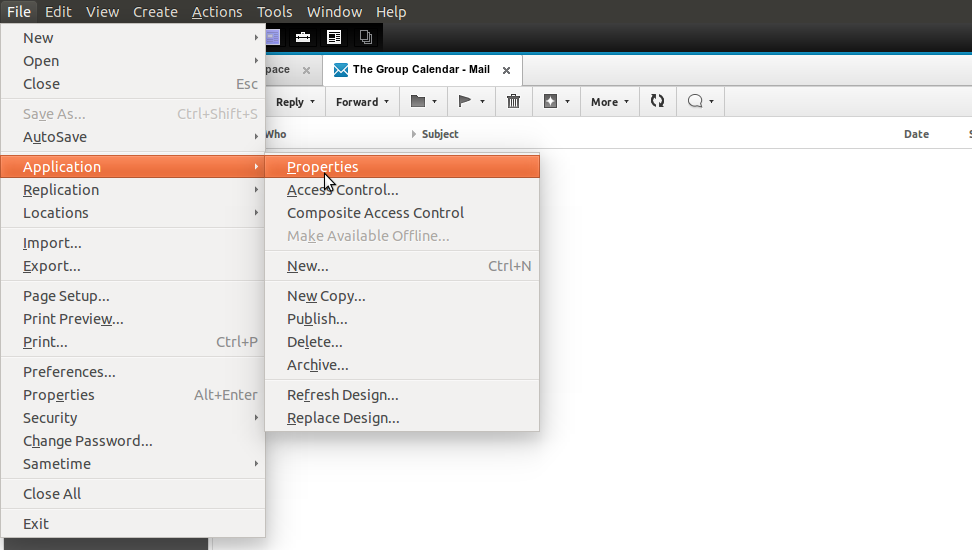
Figure 10: Changing the 'Launch' option from Mail (MailFS) to Calendar (CalendarFS)
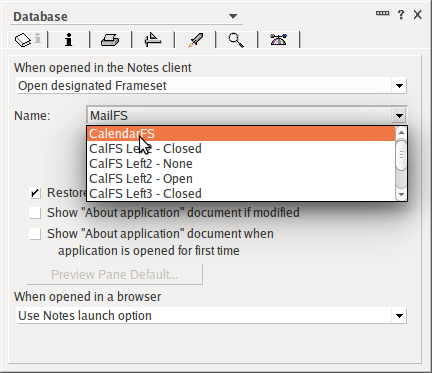
Figure 11: The newly configured Shared Calendar database, opening directly to the Calendar View
5. Add users through the Calendar Profile "Access and Delegation" who will be able to Read/Edit the Calendar Content:
Finally, managing access to the new shared calendar is pretty straight forward, and can be done without modifying the Database Access Control List (ACL), simply by changing the delegation options within the Database Profile to include the users or groups who will have the ability to Manage the calendar content, or to simply Read the content of the shared Calendar.
To Add or Remove people from the Calendar's "Access and Delegation" list, follow these steps:
- From the Database "Action Bar", choose [More] -> [Preferences] (see Figure 5: Accessing the Database Preferences, above),
- Go to the Access and Delegation Tab of the Database Preferences,
- Next to "Delegate access to these people or groups:", Choose the [Add...] button
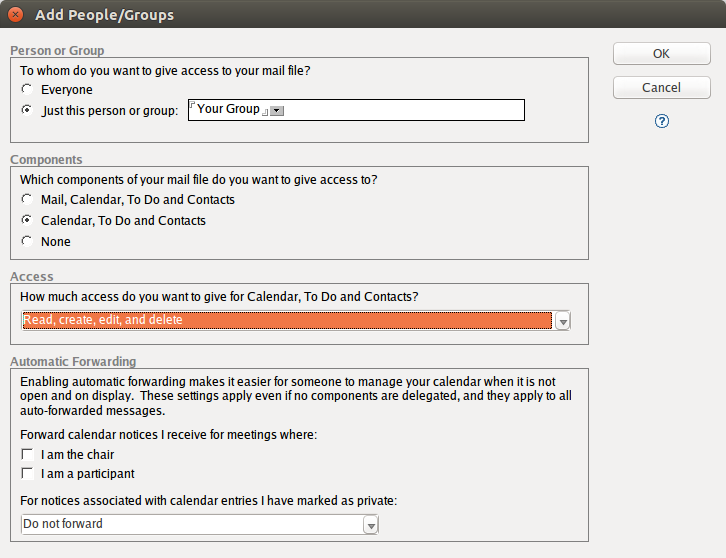
- In the "Add People/Groups" dialog, Choose an Individual or group who you are assigning access, choose whether they will be able to create/manage or only read the Calendar,
- Choose Ok
- Choose Ok to close the Calendar Preferences
Figure 12: The Database 'Access and Delegation' dialog
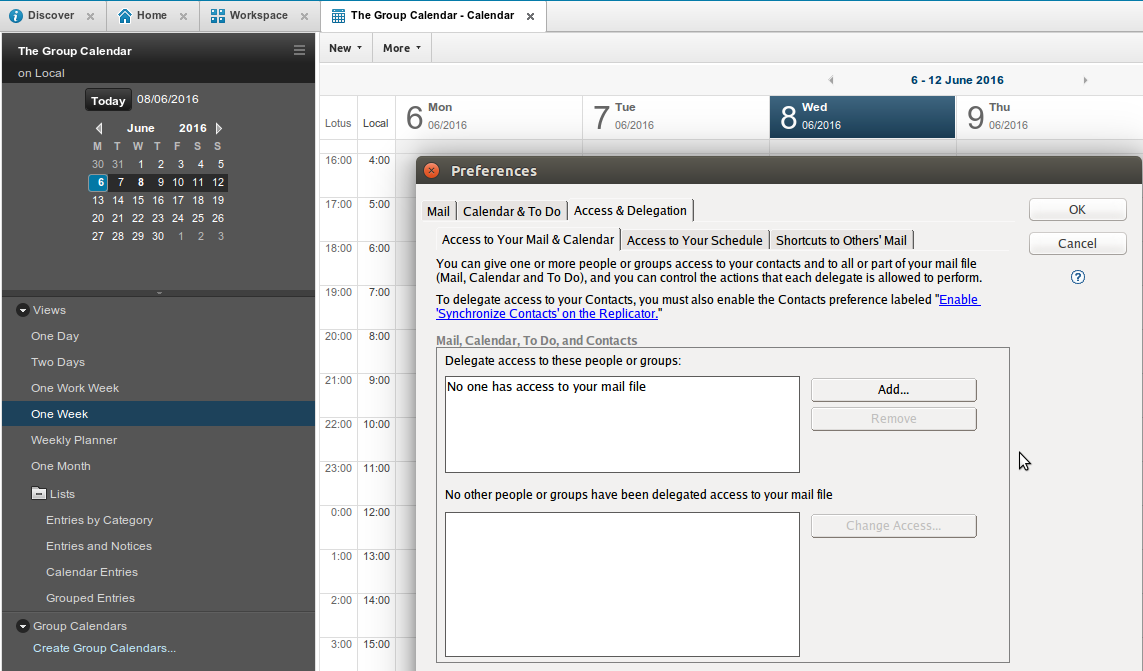
Figure 13: Adding a User or Group to the Calendar access profile
And that's IT!
You now have a Database configured as a shared calendar, which can be accessed by anyone who is added to the Calendar Delegation Profile, and which can send an receive Calendar Invitations and Notices with full IBM Notes C&S functionality.
In the next blog, I'll show you how to set up this calendar as an overlay in your own Notes client, and how you can then access the shared calendar when on a mobile device with IBM Traveler/Verse mobile.
Enjoy!!


 Feeds
Feeds